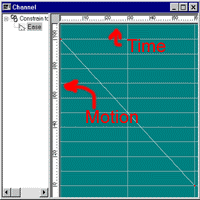
It turns out, however, that applying slow-in-slow-out is almost embarassingly easy. Why? Because you have an object which encapsulates your Line of Motion. If you apply slow-in-slow-out to the Line of Motion, everything else will follow.
So, let's do that.
Go into the PWS and find the Path Constraint that attaches your Line of
Motion Target bone to the spline. Open that and you will see an Ease
channel listed. Double click this Ease channel and you will get a
channel display.
Channels are good for a great many things, but they are at their best
when applying slow-in-slow-out.
 Before you can
really apply your slow-in-slow-out, you need to know what various shapes
of channel mean in terms of motion. Remember that the Ease channel
represents distance (in the vertical direction) mapped against time (in
the horizontal direction).
So, obviously,
a steeper line would represent a faster speed. Likewise, a shallower
line would represent a slower speed.
Likewise, if a
curve goes from being shallow to being steep, it is accelerating.
If it goes from being steep to being shallow, it is decelerating.
What does all this have to do with slow-in-slow-out? Move on to the
next page and learn!
Next Page
Previous Page
Back to Dojo