 Select the Line
of Motion object from the PWS. Click the Bones mode.
Select the Line
of Motion object from the PWS. Click the Bones mode.
What you need to do instead is to create a second target on the same path. Last time we created the bone in the Modelling window. This time, just for variety, let's do it in Choreography.
Select the Line
of Motion object from the PWS. Click the Bones mode.
You will see the Line of Motion Target bone. Click 'A' and click somewhere well away from the Target bone. Drag forward a little bit to get some length on your new bone. It will probably be named 'Bone 1' or some such thing. Rename it 'Line of Motion Target 2'.
Switch to Skeletal mode. Click on the new target bone in order
to create a channel in the Choreography action. Right-click on that
channel and create a New Path constraint. Use the drop-down to select
the Line of Motion object. Use the Eyedropper to select the line
of motion spline.
 Now you want to
exactly replicate the Ease channel from the first target bone in
the ease channel of the second target bone. In order to do this, you should
bring up the second target bone ease channel by double clicking it.
Then, click on the Ease channel from the first target bone, and drag it
into the area on the right side of the channel display (where the
name of the channel is listed). This should bring both channels up
in the window.
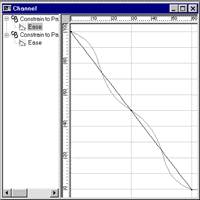
Now you want to
exactly replicate the Ease channel from the first target bone in
the ease channel of the second target bone. In order to do this, you should
bring up the second target bone ease channel by double clicking it.
Then, click on the Ease channel from the first target bone, and drag it
into the area on the right side of the channel display (where the
name of the channel is listed). This should bring both channels up
in the window.
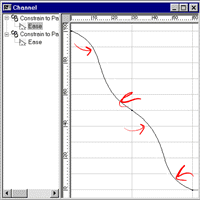 For each control
point in the first Ease channel, make sure there is a corresponding control
point in the second Ease channel with the exact same settings.
For each control
point in the first Ease channel, make sure there is a corresponding control
point in the second Ease channel with the exact same settings.
So, what's the point of this? After all, if you scrub through the frames now, you'll see that the two bones are exactly synchronized. So the second bone isn't much good, is it?
Go to the next page and find out.
Next Page
Previous Page
Back to Dojo